Email Authorization
Before you connect a customer service mailbox in Niceggie, you need to complete authorization on the mail provider's side — either an OAuth sign-in or an authorization code. This page walks through the 10 supported mail providers below; use the table to jump straight to the section you need.
Overview
🔐 = OAuth authorization (sign in to your Microsoft/Google account when prompted — no code to generate in advance) 🔑 = Authorization code / App Password (generate this on the provider's side first, then paste it into Niceggie's Connect Your Email page)
| Provider | Authorization method | Jump to |
|---|---|---|
| Outlook | 🔐 OAuth | View guide |
| Hotmail | 🔐 OAuth | View guide |
| Gmail / Google Workspace | 🔑 App Password | View guide |
| QQ Mail | 🔑 Authorization Code | View guide |
| 126 / 163 Mail (incl. NetEase Enterprise Mail) | 🔑 Authorization Code | View guide |
| Tencent Enterprise Mail | 🔑 Authorization Code | View guide |
| Aliyun Mail (Personal / Enterprise) | 🔑 Authorization Code | View guide |
| Feishu Mail | 🔑 Authorization Code | View guide |
| Zoho Mail | 🔑 App Password | View guide |
| 263 Enterprise Mail | 🔑 Authorization Code | View guide |
Outlook
Authorization method: 🔐 OAuth. No code needed in advance — on Niceggie's Connect Your Email page, choose Outlook and follow the on-screen prompts to sign in to your Microsoft account.
- Contact your IT administrator to confirm IMAP & SMTP access is enabled for this mailbox.
- On Niceggie's Connect Your Email page, choose Outlook, enter your email account, and click Authorize.
- You'll be redirected to the Microsoft sign-in page. Enter your email account and password to log in.
- Microsoft will show a consent prompt asking whether to allow Niceggie to access your mailbox. Click Accept.
- Back on Niceggie's Connect Your Email page, choose the folders you want to authorize, finish the setup, and save.
- Sign in to the web version of your Outlook account (if you use the Outlook desktop client, the path to enable IMAP may differ from the steps below).
- Click the Settings button (gear icon) in the top-right corner, then select Mail.
- On the settings page, find Forwarding and IMAP.
- Complete identity verification as prompted, then find POP and IMAP and turn on Allow devices and apps to use POP and IMAP.
- On Niceggie's Connect Your Email page, choose Outlook, enter your email account, and click Authorize.
- You'll be redirected to the Microsoft sign-in page. After logging in, Microsoft will show a consent prompt — click Accept.
- Back on Niceggie's Connect Your Email page, choose the folders you want to authorize, finish the setup, and save.
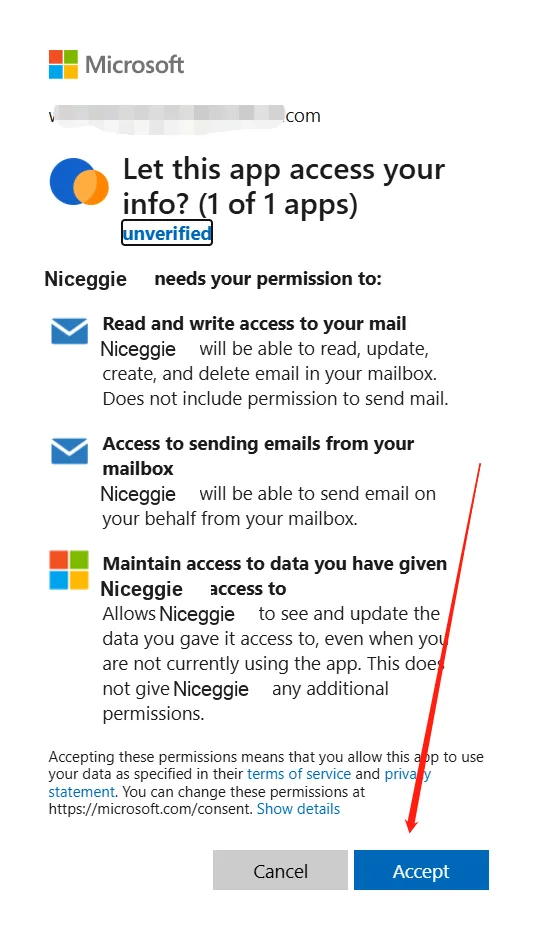
Consent window not showing up?
Check whether your browser blocked the pop-up, or sign out of your mailbox and back in once before trying to authorize again.
| Protocol | Host | Port | Encryption |
|---|---|---|---|
| IMAP | outlook.office365.com | 993 | SSL |
| SMTP | smtp.office365.com | 587 | TLS |
Server details are for reference only
OAuth authorization negotiates the connection automatically — you generally don't need to enter the server addresses manually.
Hotmail
Authorization method: 🔐 OAuth. No code needed in advance — the process is identical to Outlook.
Hotmail is now Outlook
Hotmail has been fully rebranded as Outlook. Your email address (e.g., xxx@hotmail.com) still works, and all mail, contacts, and other data have already been migrated to the Outlook service.
- Contact your IT administrator to confirm IMAP & SMTP access is enabled for this mailbox.
- On Niceggie's Connect Your Email page, choose Hotmail, enter your email account, and click Authorize.
- You'll be redirected to the Microsoft sign-in page. Enter your email account and password to log in.
- Microsoft will show a consent prompt — click Accept to allow Niceggie to access your mailbox.
- Back on Niceggie's Connect Your Email page, choose the folders you want to authorize, finish the setup, and save.
- Sign in to the web version of your Hotmail account.
- Click the Settings button (gear icon) in the top-right corner, then select Mail.
- On the settings page, find Forwarding and IMAP.
- Complete identity verification as prompted, then find POP and IMAP and turn on Allow devices and apps to use POP and IMAP.
- On Niceggie's Connect Your Email page, choose Hotmail, enter your email account, and click Authorize.
- You'll be redirected to the Microsoft sign-in page. After logging in, Microsoft will show a consent prompt — click Accept.
- Back on Niceggie's Connect Your Email page, choose the folders you want to authorize, finish the setup, and save.
| Protocol | Host | Port | Encryption |
|---|---|---|---|
| IMAP | outlook.office365.com | 993 | SSL |
| SMTP | smtp.office365.com | 587 | TLS |
Server details are for reference only
OAuth authorization negotiates the connection automatically — you generally don't need to enter the server addresses manually.
Gmail / Google Workspace
Authorization method: 🔑 App Password. You need to turn on 2-Step Verification and generate an App Password first, then paste it into Niceggie's Connect Your Email page.
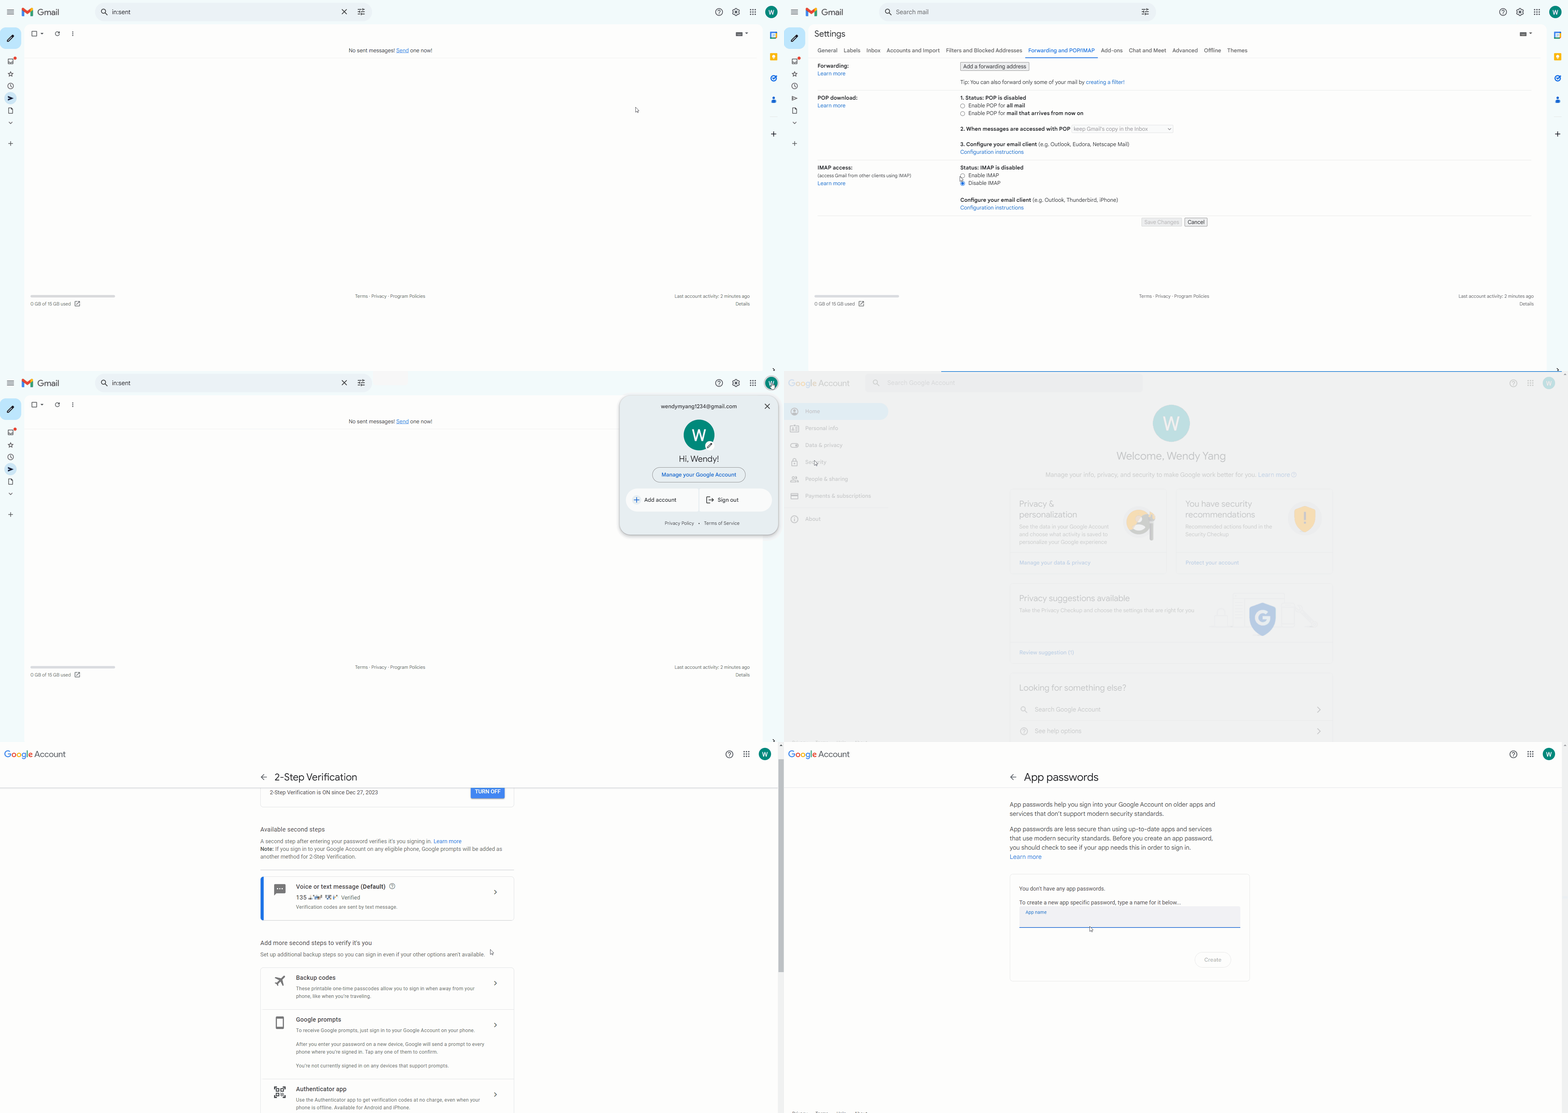
- Sign in to your Gmail account.
- Click Settings (gear icon) in the top-right corner, then See all settings.
- On the Forwarding and POP/IMAP tab, set IMAP access to Enable IMAP and save changes (this step doesn't generate an authorization code).
- Click your account avatar in the top-right corner and select Manage your Google Account.
- In the left menu, select Security → 2-Step Verification. If it isn't enabled yet, follow the prompts to turn it on (you may need to verify your identity).
- Once 2-Step Verification is on, scroll to the bottom of the Security page to find App Passwords, or go directly to
myaccount.google.com/apppasswords. - On the page that opens, type a name of your choice (e.g., Niceggie) in the App name field and click Create. Google will generate a 16-character App Password.
- Copy the full password (including the spaces) and paste it into the authorization code field on Niceggie's Connect Your Email page, then save.
2-Step Verification is required first
Your Google account must have 2-Step Verification turned on before the App Passwords option appears; it stays hidden otherwise.
Google Workspace works the same way
Google Workspace (business) mailboxes follow the same authorization steps as personal Gmail. If your account is centrally managed and 2-Step Verification or App Passwords aren't available, ask your administrator to enable them first.
| Protocol | Host | Port | Encryption |
|---|---|---|---|
| IMAP | imap.gmail.com | 993 | SSL |
| SMTP | smtp.gmail.com | 465 | SSL |
QQ Mail
Authorization method: 🔑 Authorization Code. Generate the code in QQ Mail first, then paste it into Niceggie's Connect Your Email page.
- Sign in to your QQ Mail account.
- Click Account and Security in the top-right corner.
- In the left navigation, find Security Settings.
- Enable the POP3/IMAP/SMTP/Exchange/CardDAV service.
- Click Generate Authorization Code (the first time you do this, you may need to verify your identity, e.g., via SMS).
- Copy the generated code and paste it into the authorization code field on Niceggie's Connect Your Email page, then save.
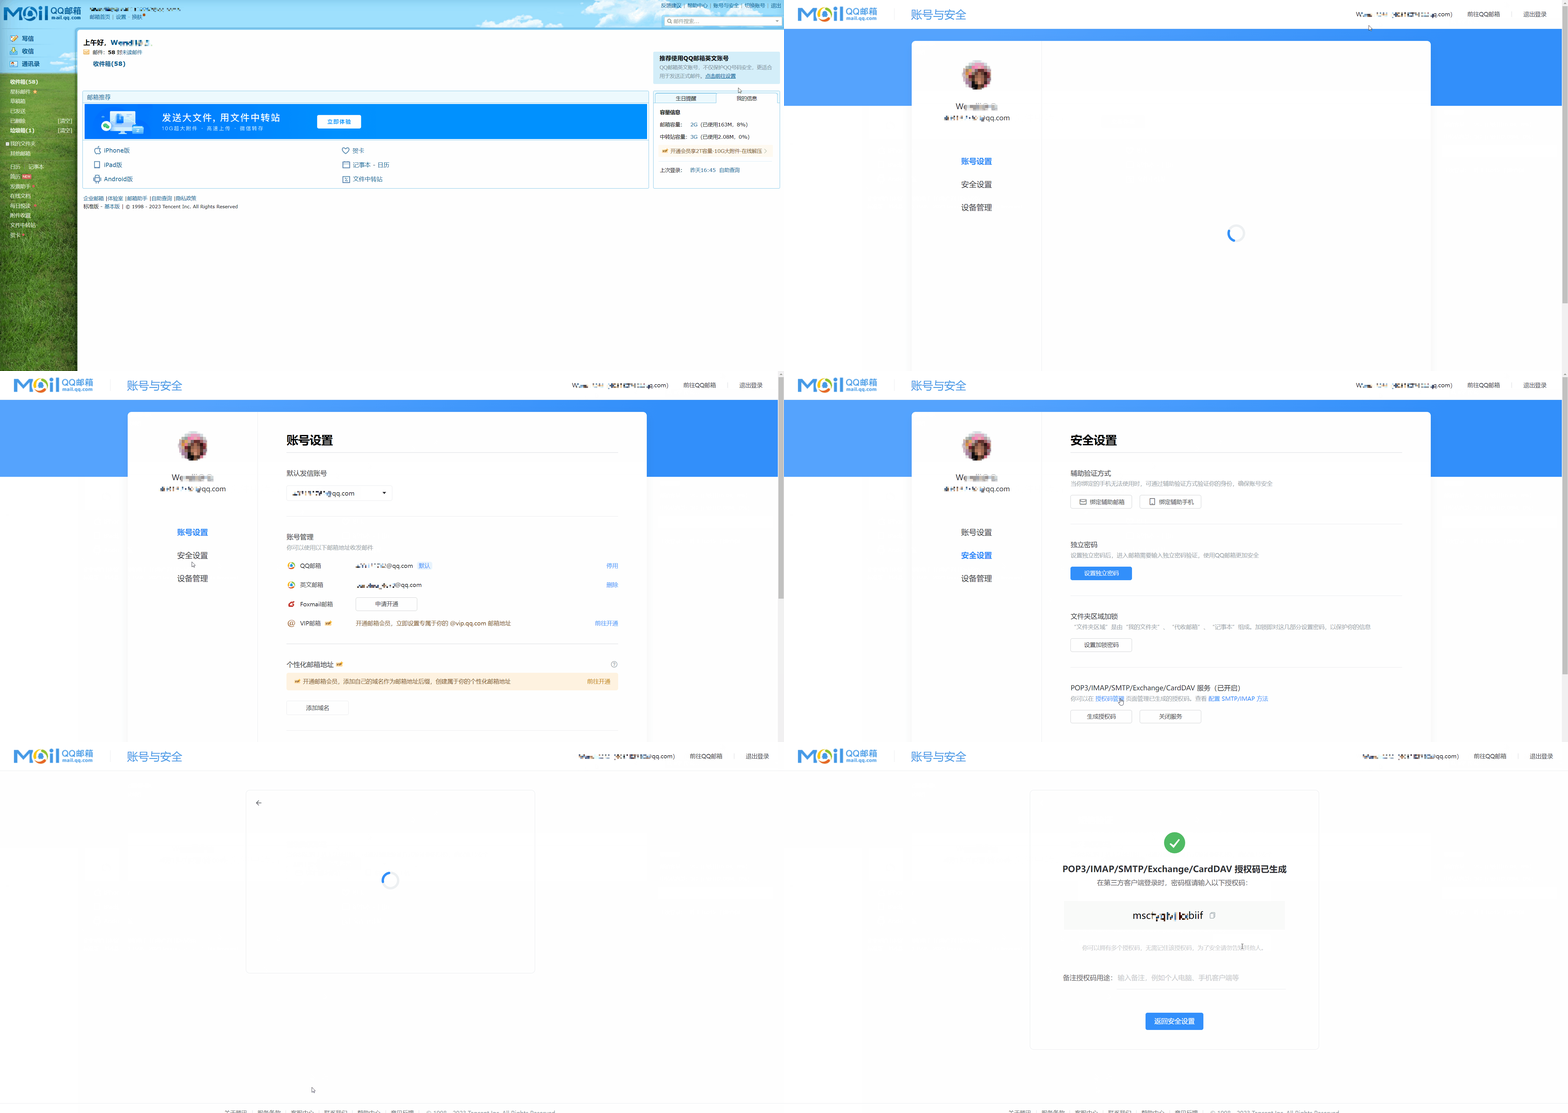
The code is only shown once
Copy and save it immediately after generating it. If you lose it, you can generate a new one to replace it at any time.
| Protocol | Host | Port | Encryption |
|---|---|---|---|
| IMAP | imap.qq.com | 993 | SSL |
| SMTP | smtp.qq.com | 465 | SSL |
126 / 163 Mail (incl. NetEase Enterprise Mail)
Authorization method: 🔑 Authorization Code. Enable IMAP/SMTP and generate the code on the provider's side first. Personal mailboxes and NetEase Enterprise Mail have slightly different entry points — pick the matching tab below.
- Sign in to your 126 personal email account.
- Click the Settings button (gear icon) in the top-right corner, then select Settings.
- In the left navigation, find Account Settings.
- On the settings page, find IMAP/SMTP and enable the service.
- Complete identity verification as prompted; the page will display an authorization code. Copy it and paste it into Niceggie's Connect Your Email page, then save.
- Back on the mailbox homepage, click Security Level and wait for the health check to finish. Find the IMAP service row, hover over the end of it, and click Trust to finish setup and keep the connection stable.
| Protocol | Host | Port | Encryption |
|---|---|---|---|
| IMAP | imap.126.com | 993 | SSL |
| SMTP | smtp.126.com | 465 | SSL |
- Sign in to your 163 personal email account.
- Click the Settings button (gear icon) in the top-right corner, then select Settings.
- In the left navigation, find Account Settings.
- On the settings page, find IMAP/SMTP and enable the service.
- Complete identity verification as prompted; the page will display an authorization code. Copy it and paste it into Niceggie's Connect Your Email page, then save.
- Back on the mailbox homepage, click Security Level and wait for the health check to finish. Find the IMAP service row, hover over the end of it, and click Trust to finish setup and keep the connection stable.
| Protocol | Host | Port | Encryption |
|---|---|---|---|
| IMAP | imap.163.com | 993 | SSL |
| SMTP | smtp.163.com | 465 | SSL |
- Contact your mailbox administrator to enable IMAP & SMTP access for this mailbox.
- Once access is enabled, enter your email address on Niceggie's Connect Your Email page.
- Enter your enterprise mailbox's login password in the authorization code field.
- Choose the folders you want to authorize, finish the setup, and save.
| Protocol | Host | Port | Encryption |
|---|---|---|---|
| IMAP | imap.qiye.163.com | 993 | SSL |
| SMTP | smtp.qiye.163.com | 465 | SSL |
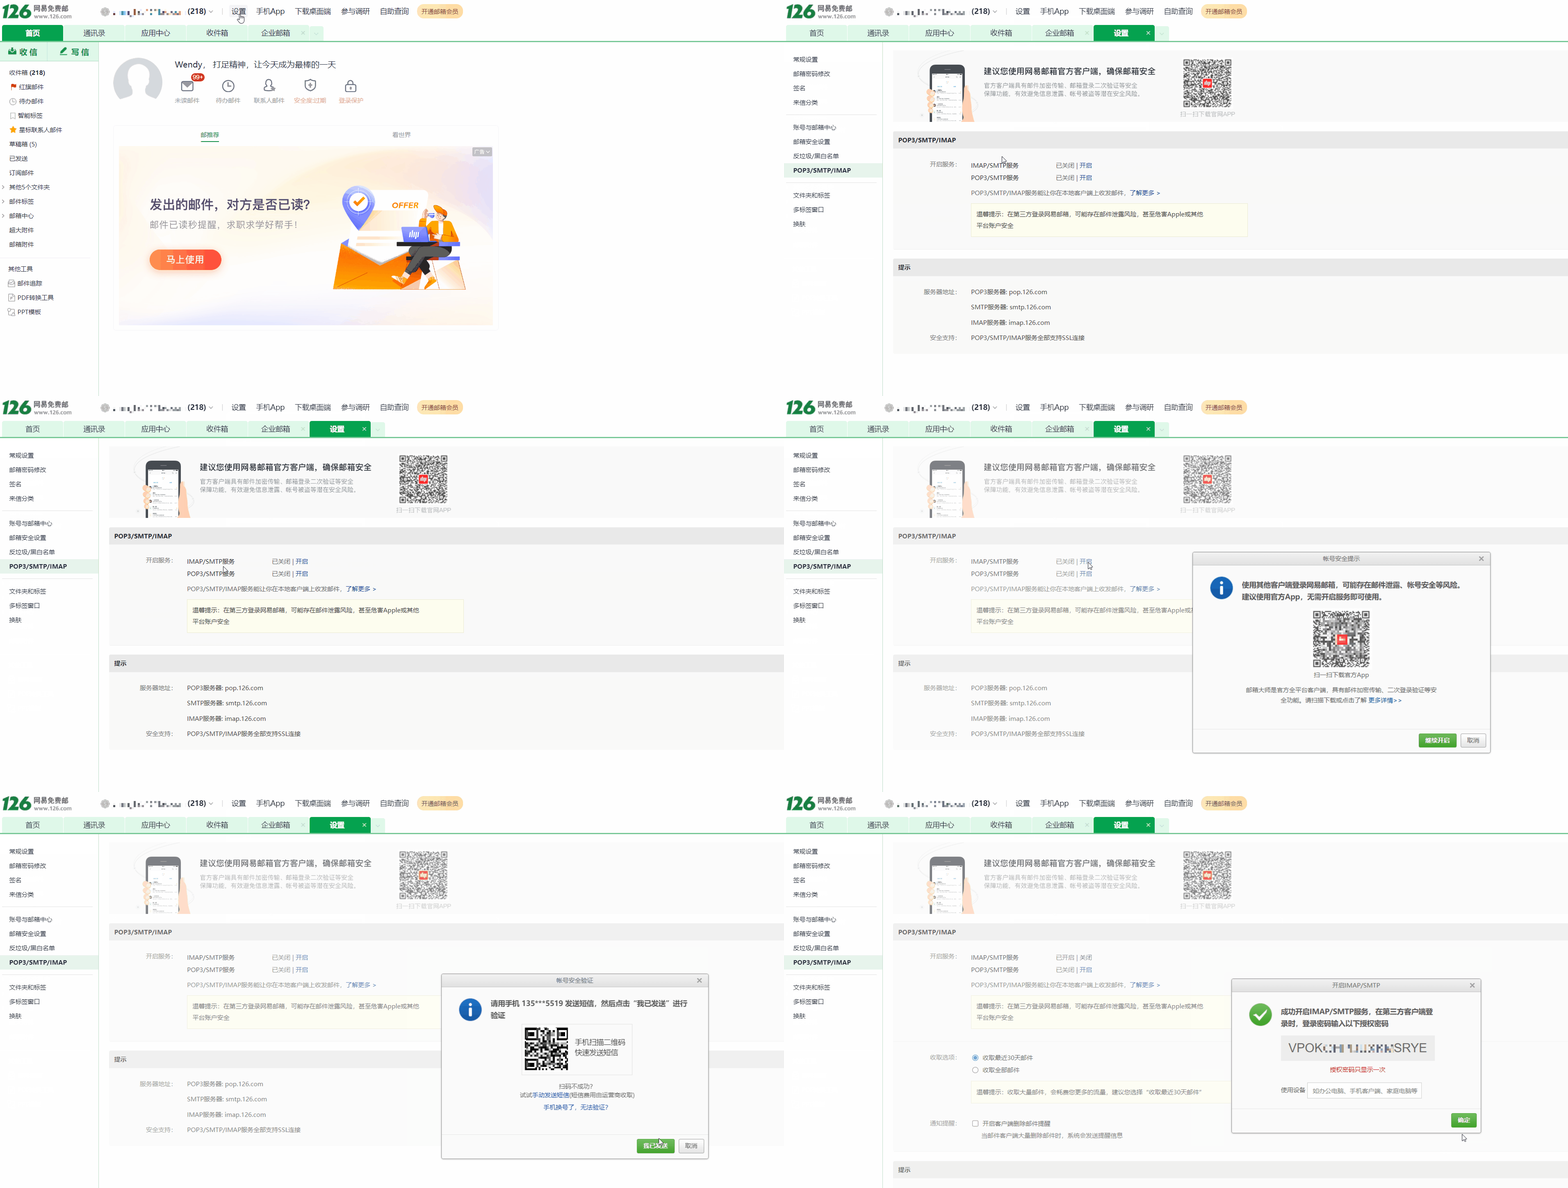
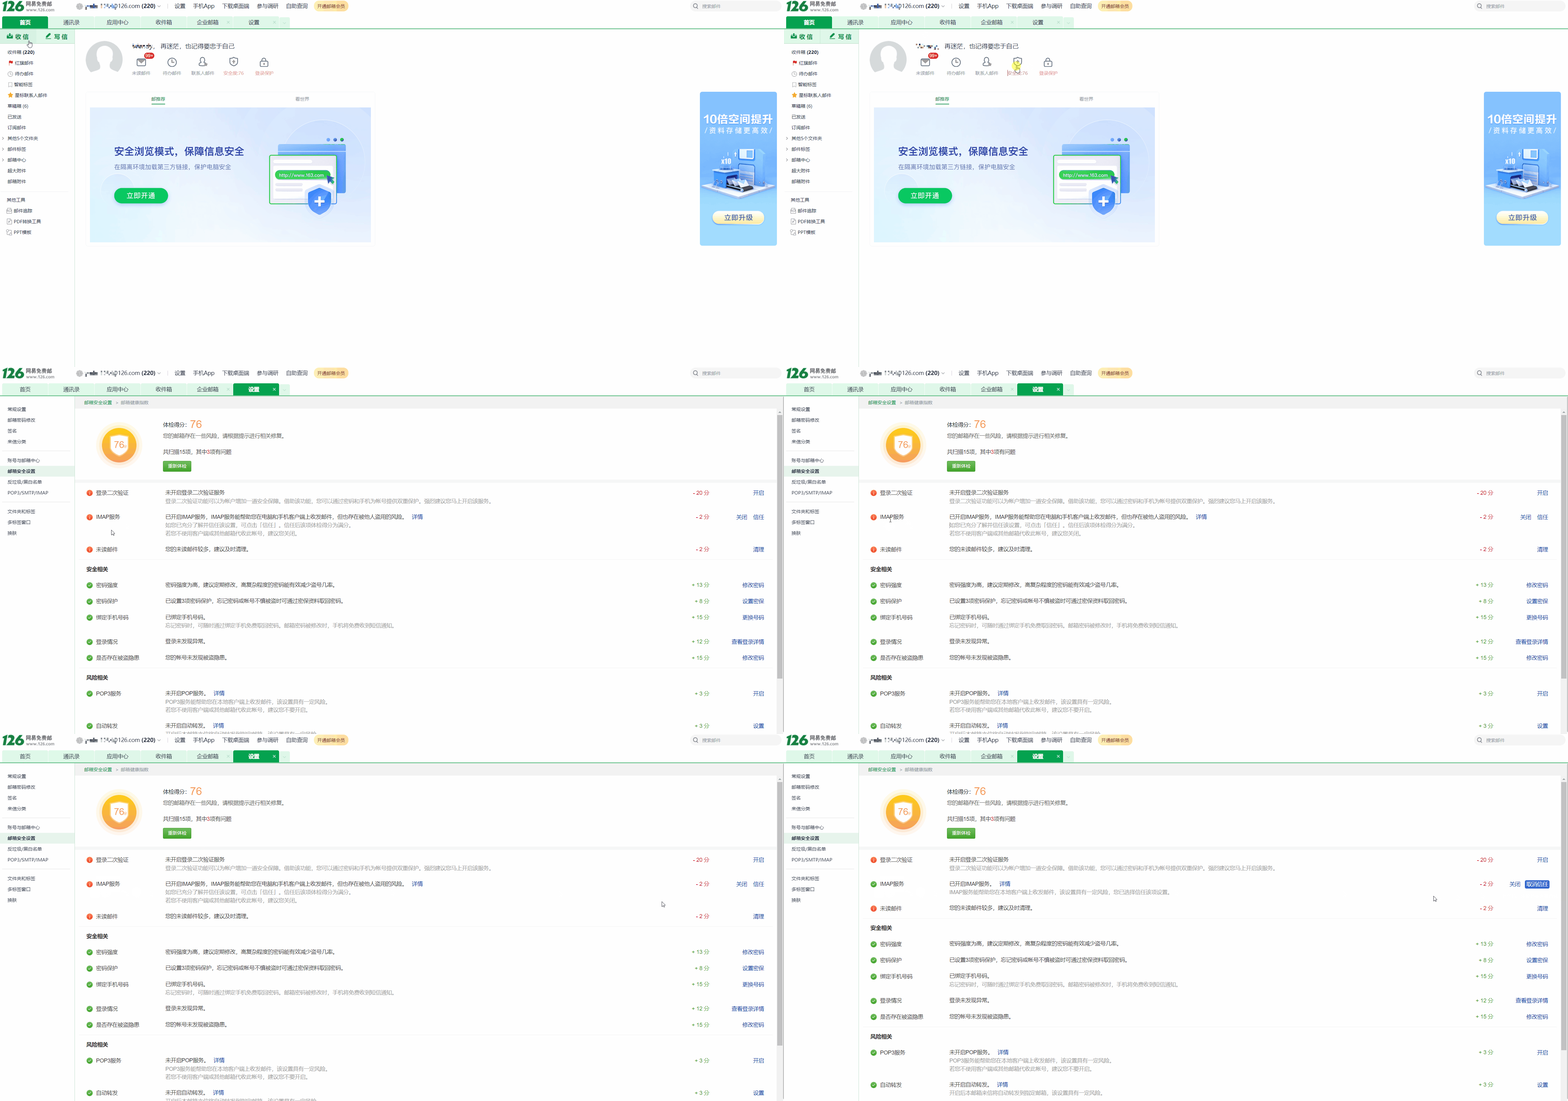
The Trust step improves connection stability
After a personal mailbox passes the Security Level check and you set the IMAP service to Trust, you'll see fewer re-verification prompts during later sync.
Tencent Enterprise Mail
Authorization method: 🔑 Authorization Code. By default this is your mailbox login password; if secure login is enabled, you'll need to generate a separate client-specific authorization code instead.
- Contact your mailbox administrator to confirm POP3/IMAP/SMTP access is enabled for this mailbox.
- Sign in to the Tencent Enterprise Mail web client, click Settings → Mail Sending and Receiving Settings, and confirm Client Service Agreement is enabled.
- If secure login is not enabled: the authorization code is simply your mailbox login password — use it directly.
- If secure login is enabled: go to Settings → Mailbox Binding and generate a client-specific authorization code.
- Paste the code (your login password or the client-specific code) into the authorization code field on Niceggie's Connect Your Email page, choose the folders you want to authorize, and save.
Not sure whether secure login is enabled?
Check the current login-protection status under Tencent Enterprise Mail's Settings → Security Settings; contact your mailbox administrator if you're unsure.
| Protocol | Host | Port | Encryption |
|---|---|---|---|
| IMAP | imap.exmail.qq.com | 993 | SSL |
| SMTP | smtp.exmail.qq.com | 465 | SSL |
Aliyun Mail (Personal / Enterprise)
Authorization method: 🔑 Authorization Code (Aliyun Mail calls this a "third-party client security password"). Aliyun Mail blocks third-party client sign-in by default, so you first need to confirm the relevant permission is enabled, then generate a security password to use as the authorization code. Personal and enterprise mailboxes sign in through different portals — pick the matching tab below.
- Confirm your account isn't restricted from third-party client sign-in by your mailbox administrator, and that IMAP or POP3 access is enabled (contact your administrator if you're unsure).
- Sign in to the web version of Aliyun Mail (mail.aliyun.com), then click Settings → Account and Security.
- Find Third-Party Client Security Password, click Generate Password, and complete identity verification as prompted (e.g., SMS code).
- Copy the generated security password and paste it into the authorization code field on Niceggie's Connect Your Email page, choose the folders you want to authorize, and save.
| Protocol | Host | Port | Encryption |
|---|---|---|---|
| IMAP | imap.aliyun.com | 993 | SSL |
| SMTP | smtp.aliyun.com | 465 | TLS |
- Contact your enterprise mailbox administrator to enable IMAP or POP3 access for this account in the admin console, and allow third-party client sign-in.
- Sign in to the web version of Aliyun Enterprise Mail (qiye.aliyun.com), then click Settings → Account and Security.
- Find Third-Party Client Security Password, click Generate Password, and complete identity verification as prompted.
- Copy the generated security password and paste it into the authorization code field on Niceggie's Connect Your Email page, choose the folders you want to authorize, and save.
| Protocol | Host | Port | Encryption |
|---|---|---|---|
| IMAP | imap.qiye.aliyun.com | 993 | SSL |
| SMTP | smtp.qiye.aliyun.com | 465 | TLS |
The security password is not your mailbox login password
Once the third-party client security password feature is enabled, third-party clients must use the generated security password — entering your regular mailbox login password will fail with a "wrong username or password" error.
Feishu Mail
Authorization method: 🔑 Authorization Code (Feishu Mail calls this a "third-party client password").
- Contact your enterprise administrator to enable Allow employees to sign in to Feishu Mail with a third-party email client in the Feishu admin console (skip this step if it's already enabled).
- Sign in to the web version of Feishu Mail, then click Settings → Account and Security.
- Find Third-Party Client Password, click Generate Password, and complete identity verification as prompted.
- Copy the generated authorization code and paste it into the authorization code field on Niceggie's Connect Your Email page, choose the folders you want to authorize, and save.
This option is hidden until an administrator enables it
The Third-Party Client Password feature must be turned on by an administrator first — employees can't enable this permission themselves from their personal settings.
| Protocol | Host | Port | Encryption |
|---|---|---|---|
| IMAP | imap.feishu.cn | 993 | SSL |
| SMTP | smtp.feishu.cn | 465 | SSL |
Zoho Mail
Authorization method: 🔑 App Password. Your sign-in domain is either pro.zoho.com (Professional) or zoho.com (Standard), depending on your account — the steps are the same either way.
- Sign in to your Zoho Mail account.
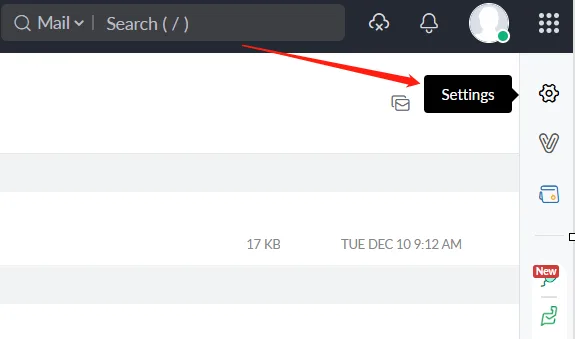
- Click Settings (gear icon) in the top-right corner.
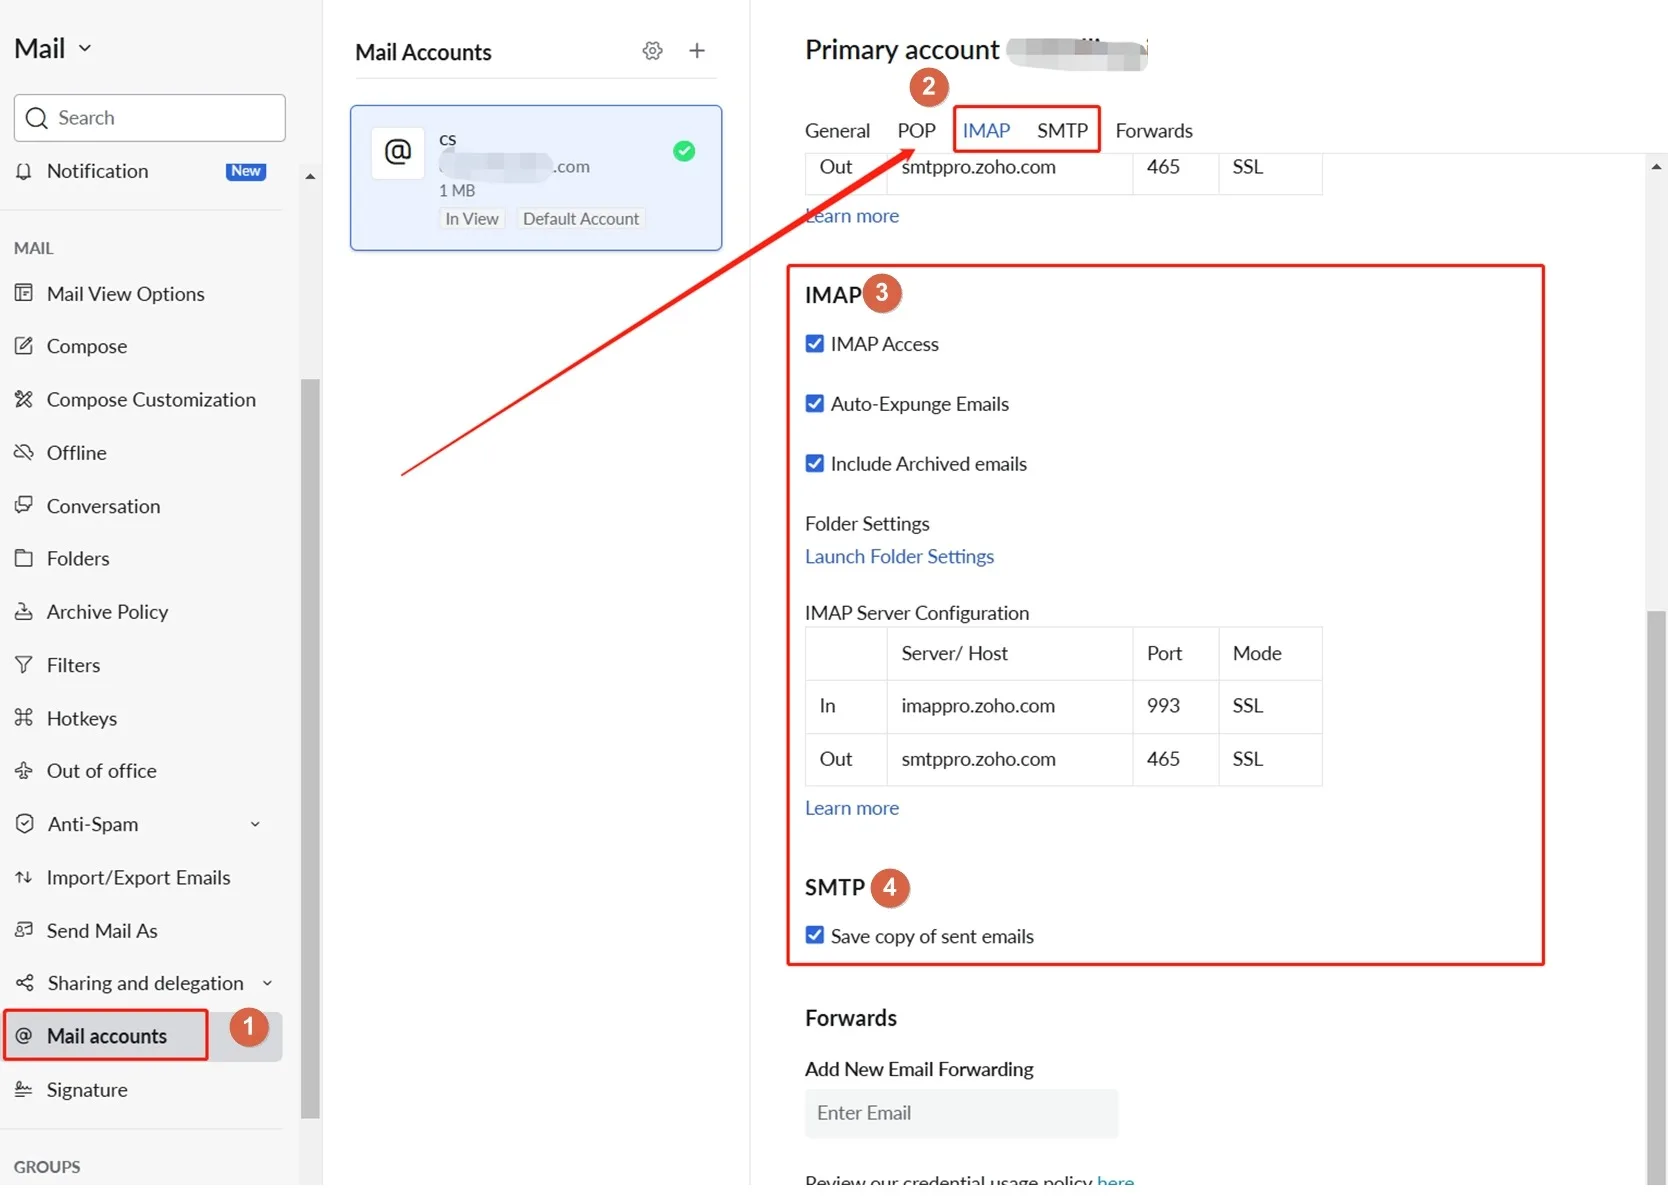
- In the left menu, select Email Accounts, then check every sub-option under IMAP and SMTP and save.
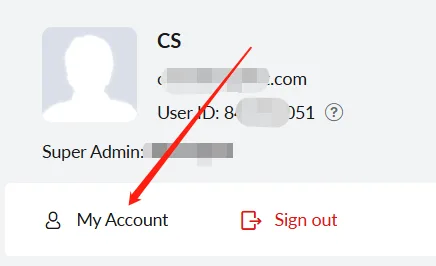
- Back on the mail list page, click your avatar in the top-right corner and select My Account.
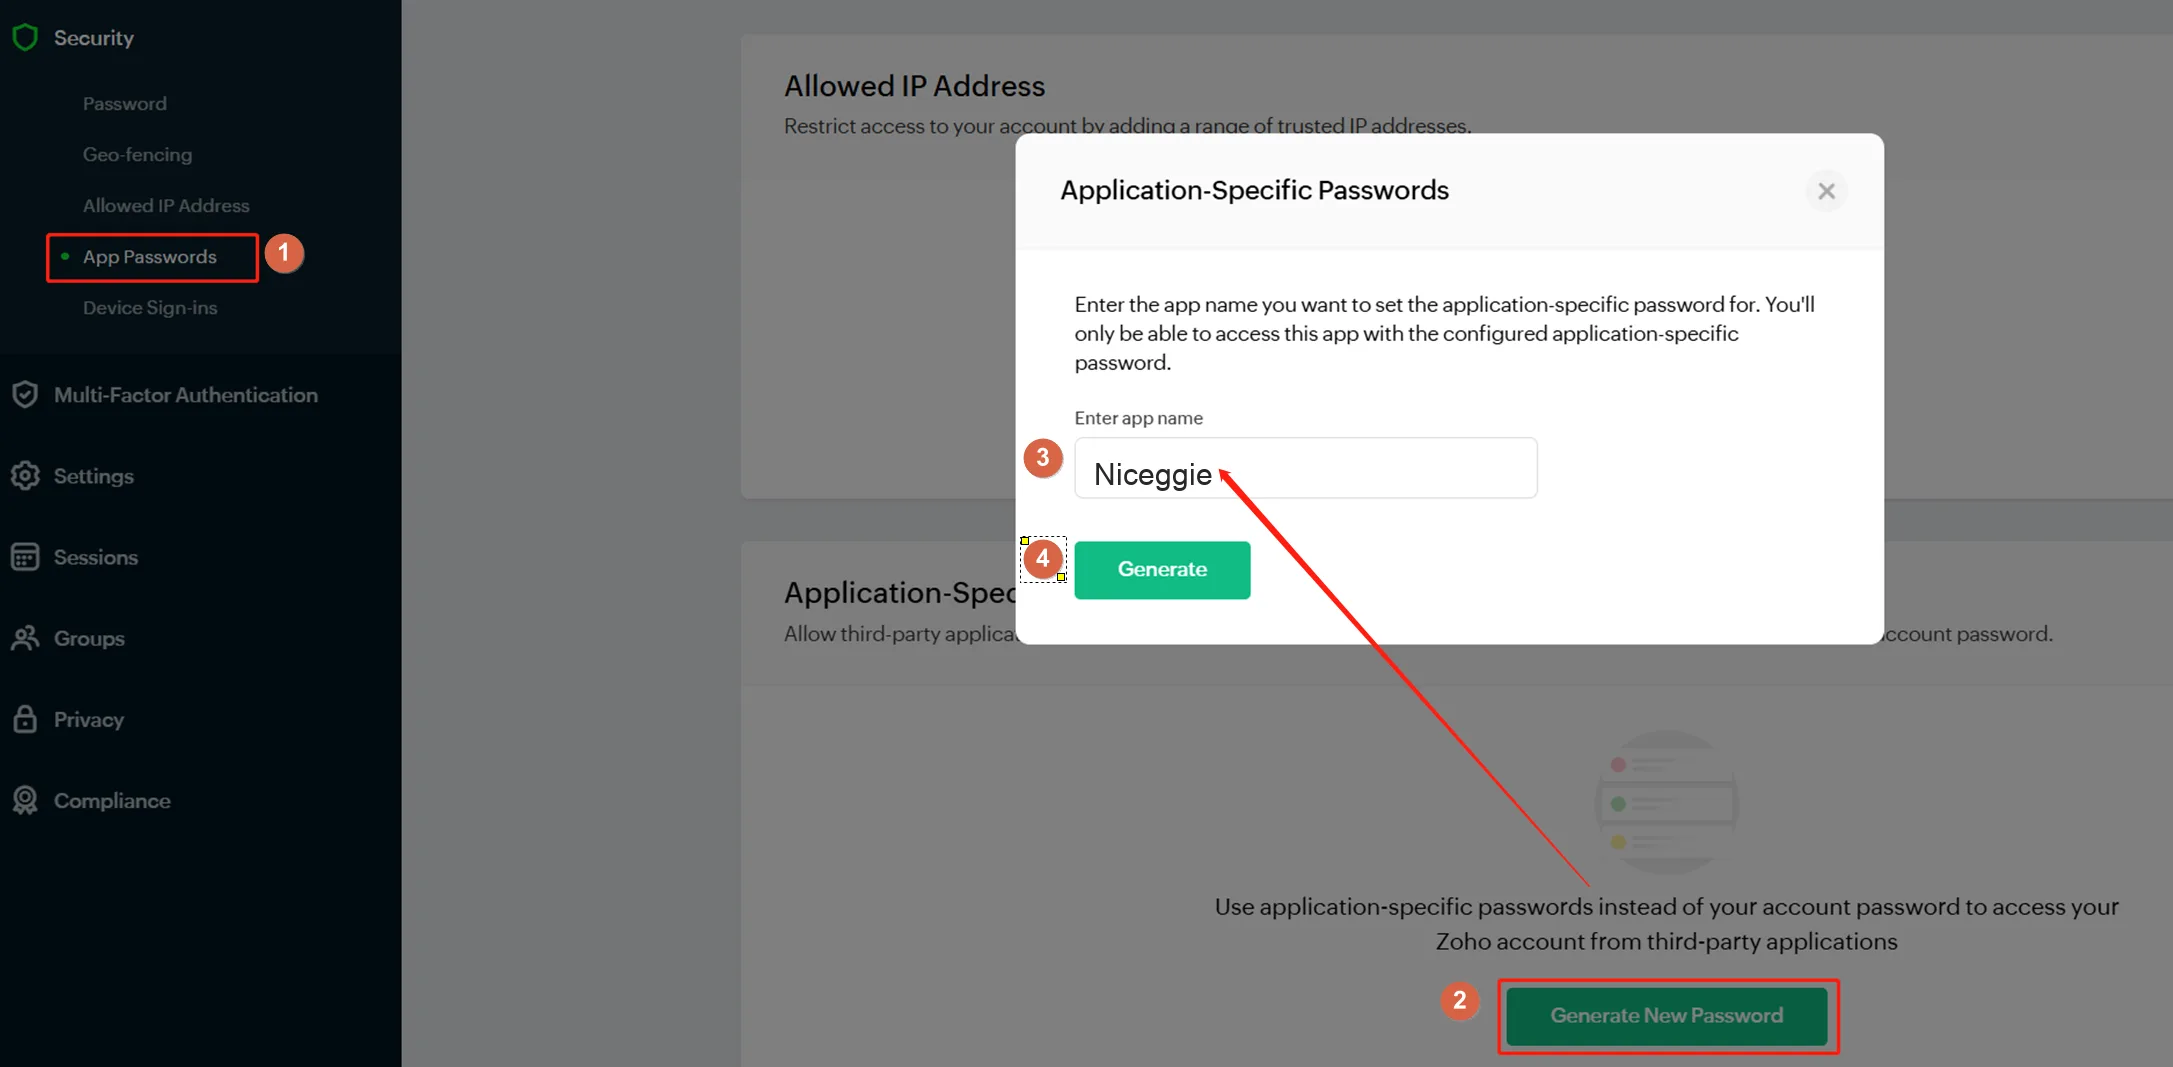
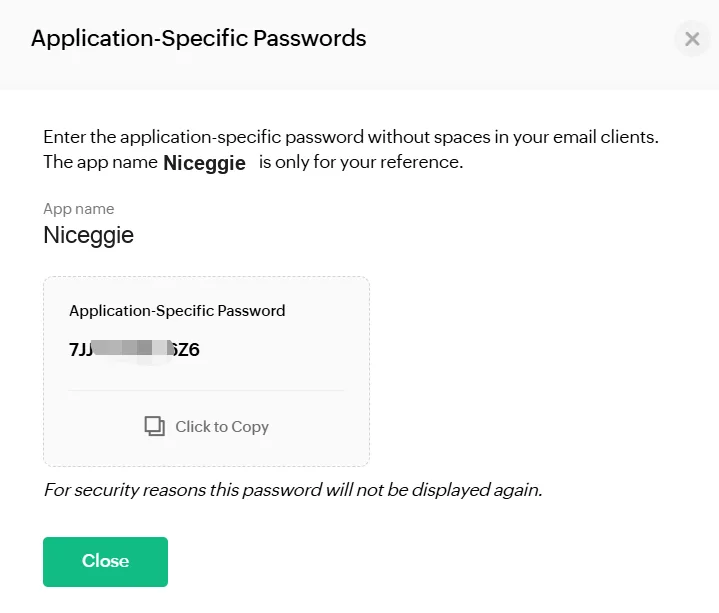
- Go to Security → App Passwords → Generate New Password. In the dialog that opens, type a name of your choice (e.g., Niceggie) in the name field and click Generate.
- Copy the generated App Password and paste it into the authorization code field on Niceggie's Connect Your Email page, choose the folders you want to authorize, and save.
The App Password is only shown once
Copy and save it immediately after generating it. If you lose it, you can generate a new one to replace it at any time.
| Protocol | Host | Port | Encryption |
|---|---|---|---|
| IMAP | imappro.zoho.com | 993 | SSL |
| SMTP | smtppro.zoho.com | 465 | SSL |
| Protocol | Host | Port | Encryption |
|---|---|---|---|
| IMAP | imap.zoho.com | 993 | SSL |
| SMTP | smtp.zoho.com | 465 | SSL |
263 Enterprise Mail
Authorization method: 🔑 Authorization Code.
- Sign in to your 263 Enterprise Mail account.
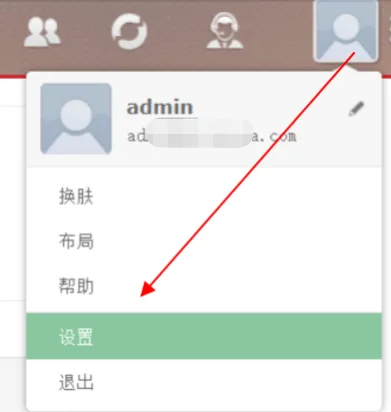
- Click your avatar in the top-right corner, then click Settings.
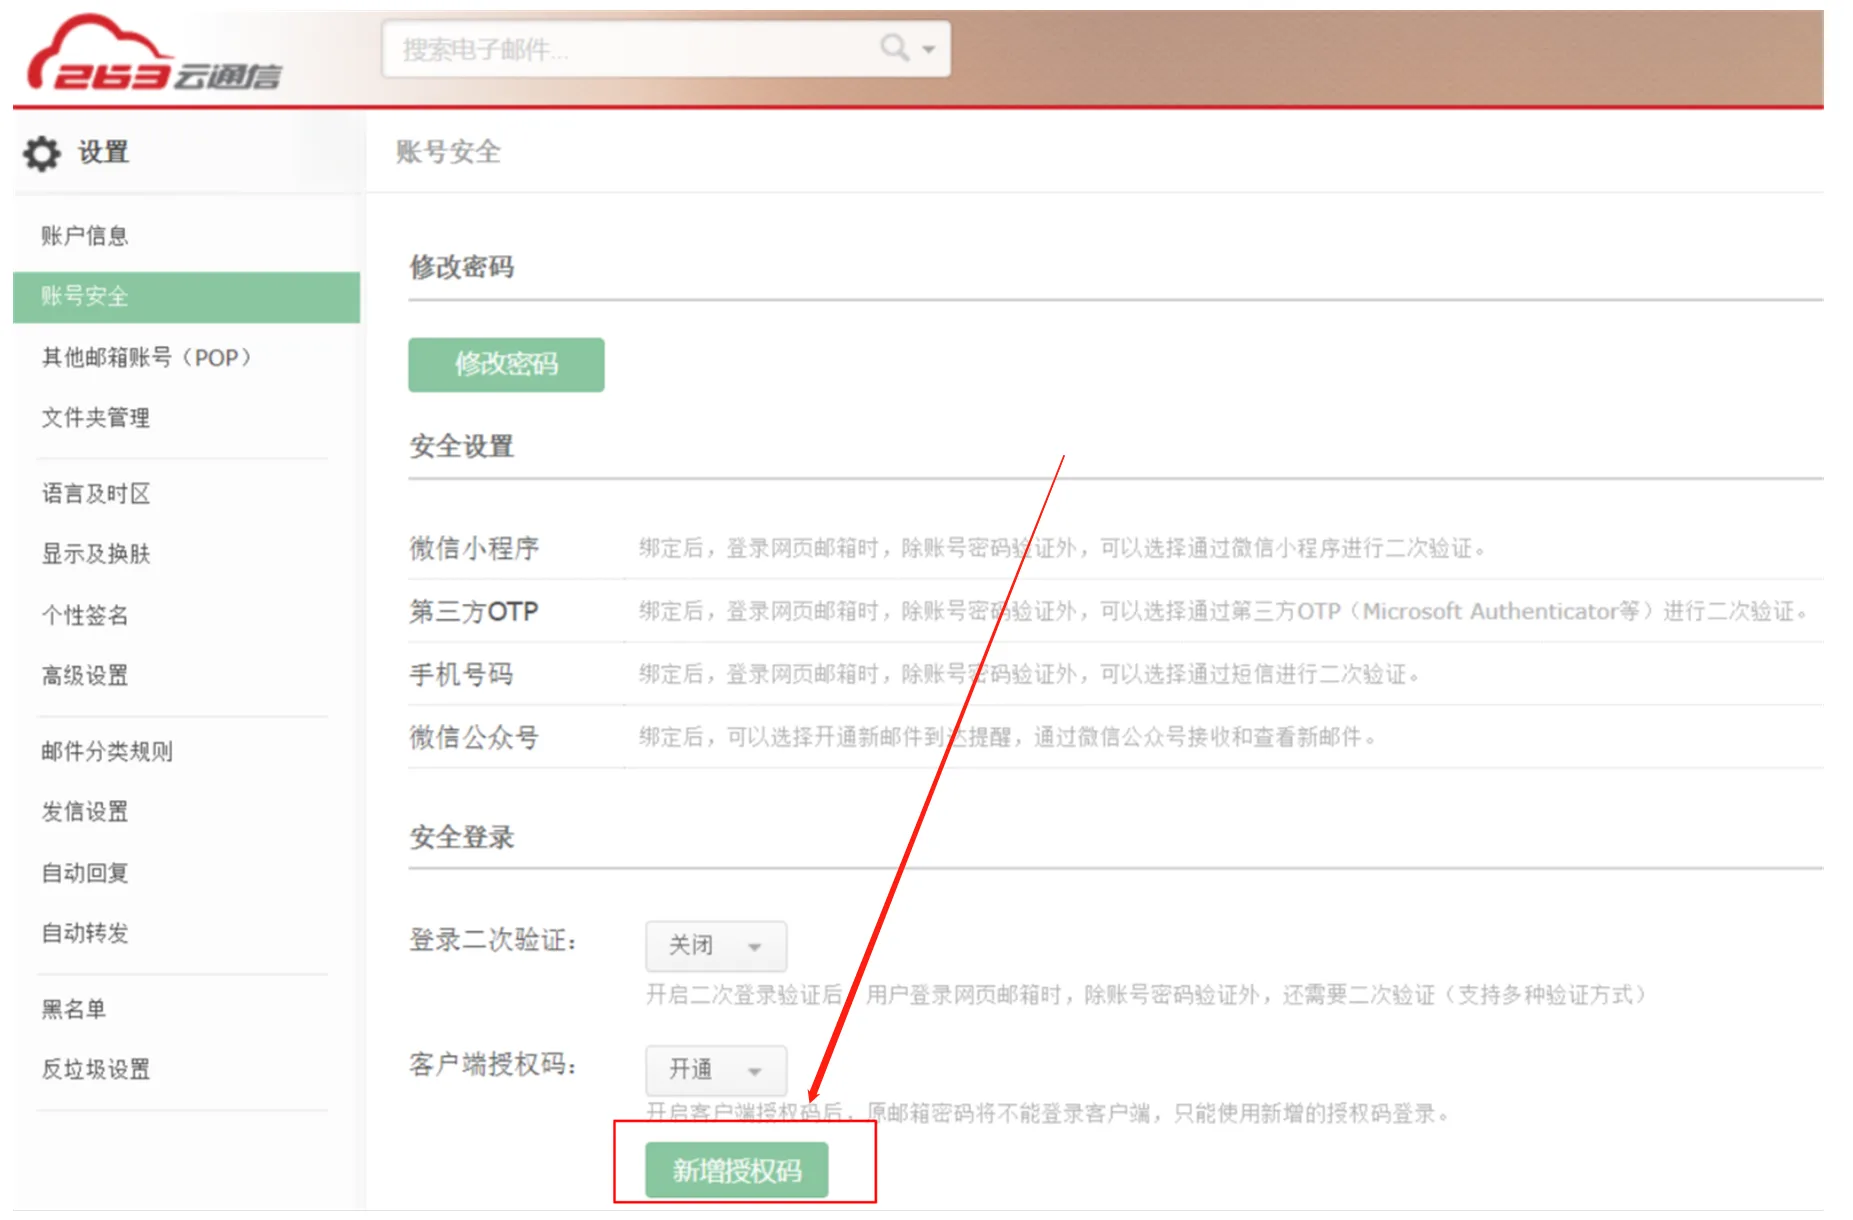
- Select Account Security, then click to add a new authorization code.
- Copy the generated code and paste it into the authorization code field on Niceggie's Connect Your Email page, choose the folders you want to authorize, and save.
The code is only shown once
Copy and save it immediately after generating it. If you lose it, you can generate a new one to replace it at any time.
| Protocol | Host | Port | Encryption |
|---|---|---|---|
| IMAP | imap.263.net | 993 | SSL |
| SMTP | smtp.263.net | 465 | SSL |